

I’ve been feeling a lack of time for creativity recently, but I finally managed to make one of the beautiful designs from the August My Greeting Box.
The focus technique was watercolour, and while I’ve always been a little nervous of painting, I managed to do OK with two previous watercolour cards!

All three designs were lovely, but I thought the Lady in Rain card looked like a good one to start with. I love the blue colour of the rain, and the sentiment is quite poignant.
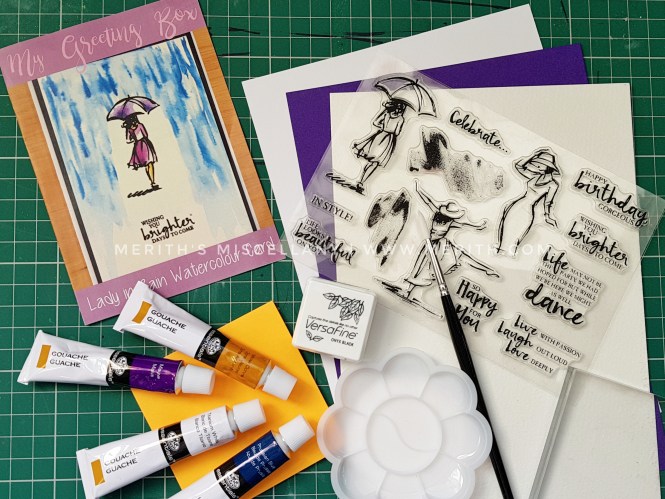
There were four tubes of gouache, and I’d be using all of them. As well as the stamps and other bits, there was a new inkpad, a Versafine ink. This is oil-based ink, so perfect for using with watercolours.

I could really tell the difference using the Versafine ink. It felt thicker and slightly sticky when I applied it to the stamp.

Another reason I wanted to make this card was that I was intrigued by the masking, which was done using sticky sheets, rather like post-it notes. After stamping the card itself, I stamped a yellow sticky sheet. Then I drew lines down from the edge of the umbrella, cut it out, and stuck it over the stamped card.
This, as you may have guessed, was to protect the stamped image on the card from the paint.

Now it was time to paint!
The yellow mask meant I could paint ‘over’ the printed picture, and give it a clean line.
The Prussian Blue paint was a beautiful colour. I had some fun adding water and mixing different shades with the white paint, varying the intensity of the blue. Vertical strokes gave a slightly impressionistic effect.

Once the ‘rain’ was done, I peeled off the mask. It worked!
Then I just needed to colour the dress and umbrella in purple, and a little bit of skin tone with the ochre.
As promised by the Versafine ink, it didn’t smudge or run even with the wet paint. It really gave a very beautiful effect.
After it dried, all I had to do was cut out a purple background and stick the whole thing to a card blank.
This turned out to be much easier than I expected!
I was quite nervous about getting the masking right, as well as painting the rain effects. But as always, the instructions are very clear and easy to follow. You’ve also got a picture of the finished card to give you a little extra guidance on how it’s supposed to look.
I don’t consider myself particularly artistic, but I’ve managed to produce some really rather nice results! My Greeting Box is such a wonderful way to create beautiful card designs. One thing I particularly enjoy is that you have to do everything from scratch. You get everything you need, but you have to do the measuring, cutting out, sticking, and colouring. It’s much more satisfying than simply having all the bits prepared for you to just stick together.
Finishing a card always gives me a sense of achievement, and I am as happy to give them as others are to receive them.

*************************************
Thank you for reading! Click here to see previous boxes and more of the cards I’ve made.
My Greeting Box is a monthly package of card making supplies delivered straight to your door. Keep an eye out on our website and social media for sneak peeks about the theme and card designs! Every month you will get three card designs to recreate and materials to make even more cards!
All this for only £22 a month! And that’s not all… use the code FIRST25 at checkout for a 25% off your first box!
************************************


